What CaptionFit does
CaptionFit turns an audio or video file into a finished, captioned video in
three moves: transcribe the audio, sync & edit the captions,
then render the video (or just download the subtitle file). Everything
happens in your browser at captionfit.com/app-v2 — no software to
install.
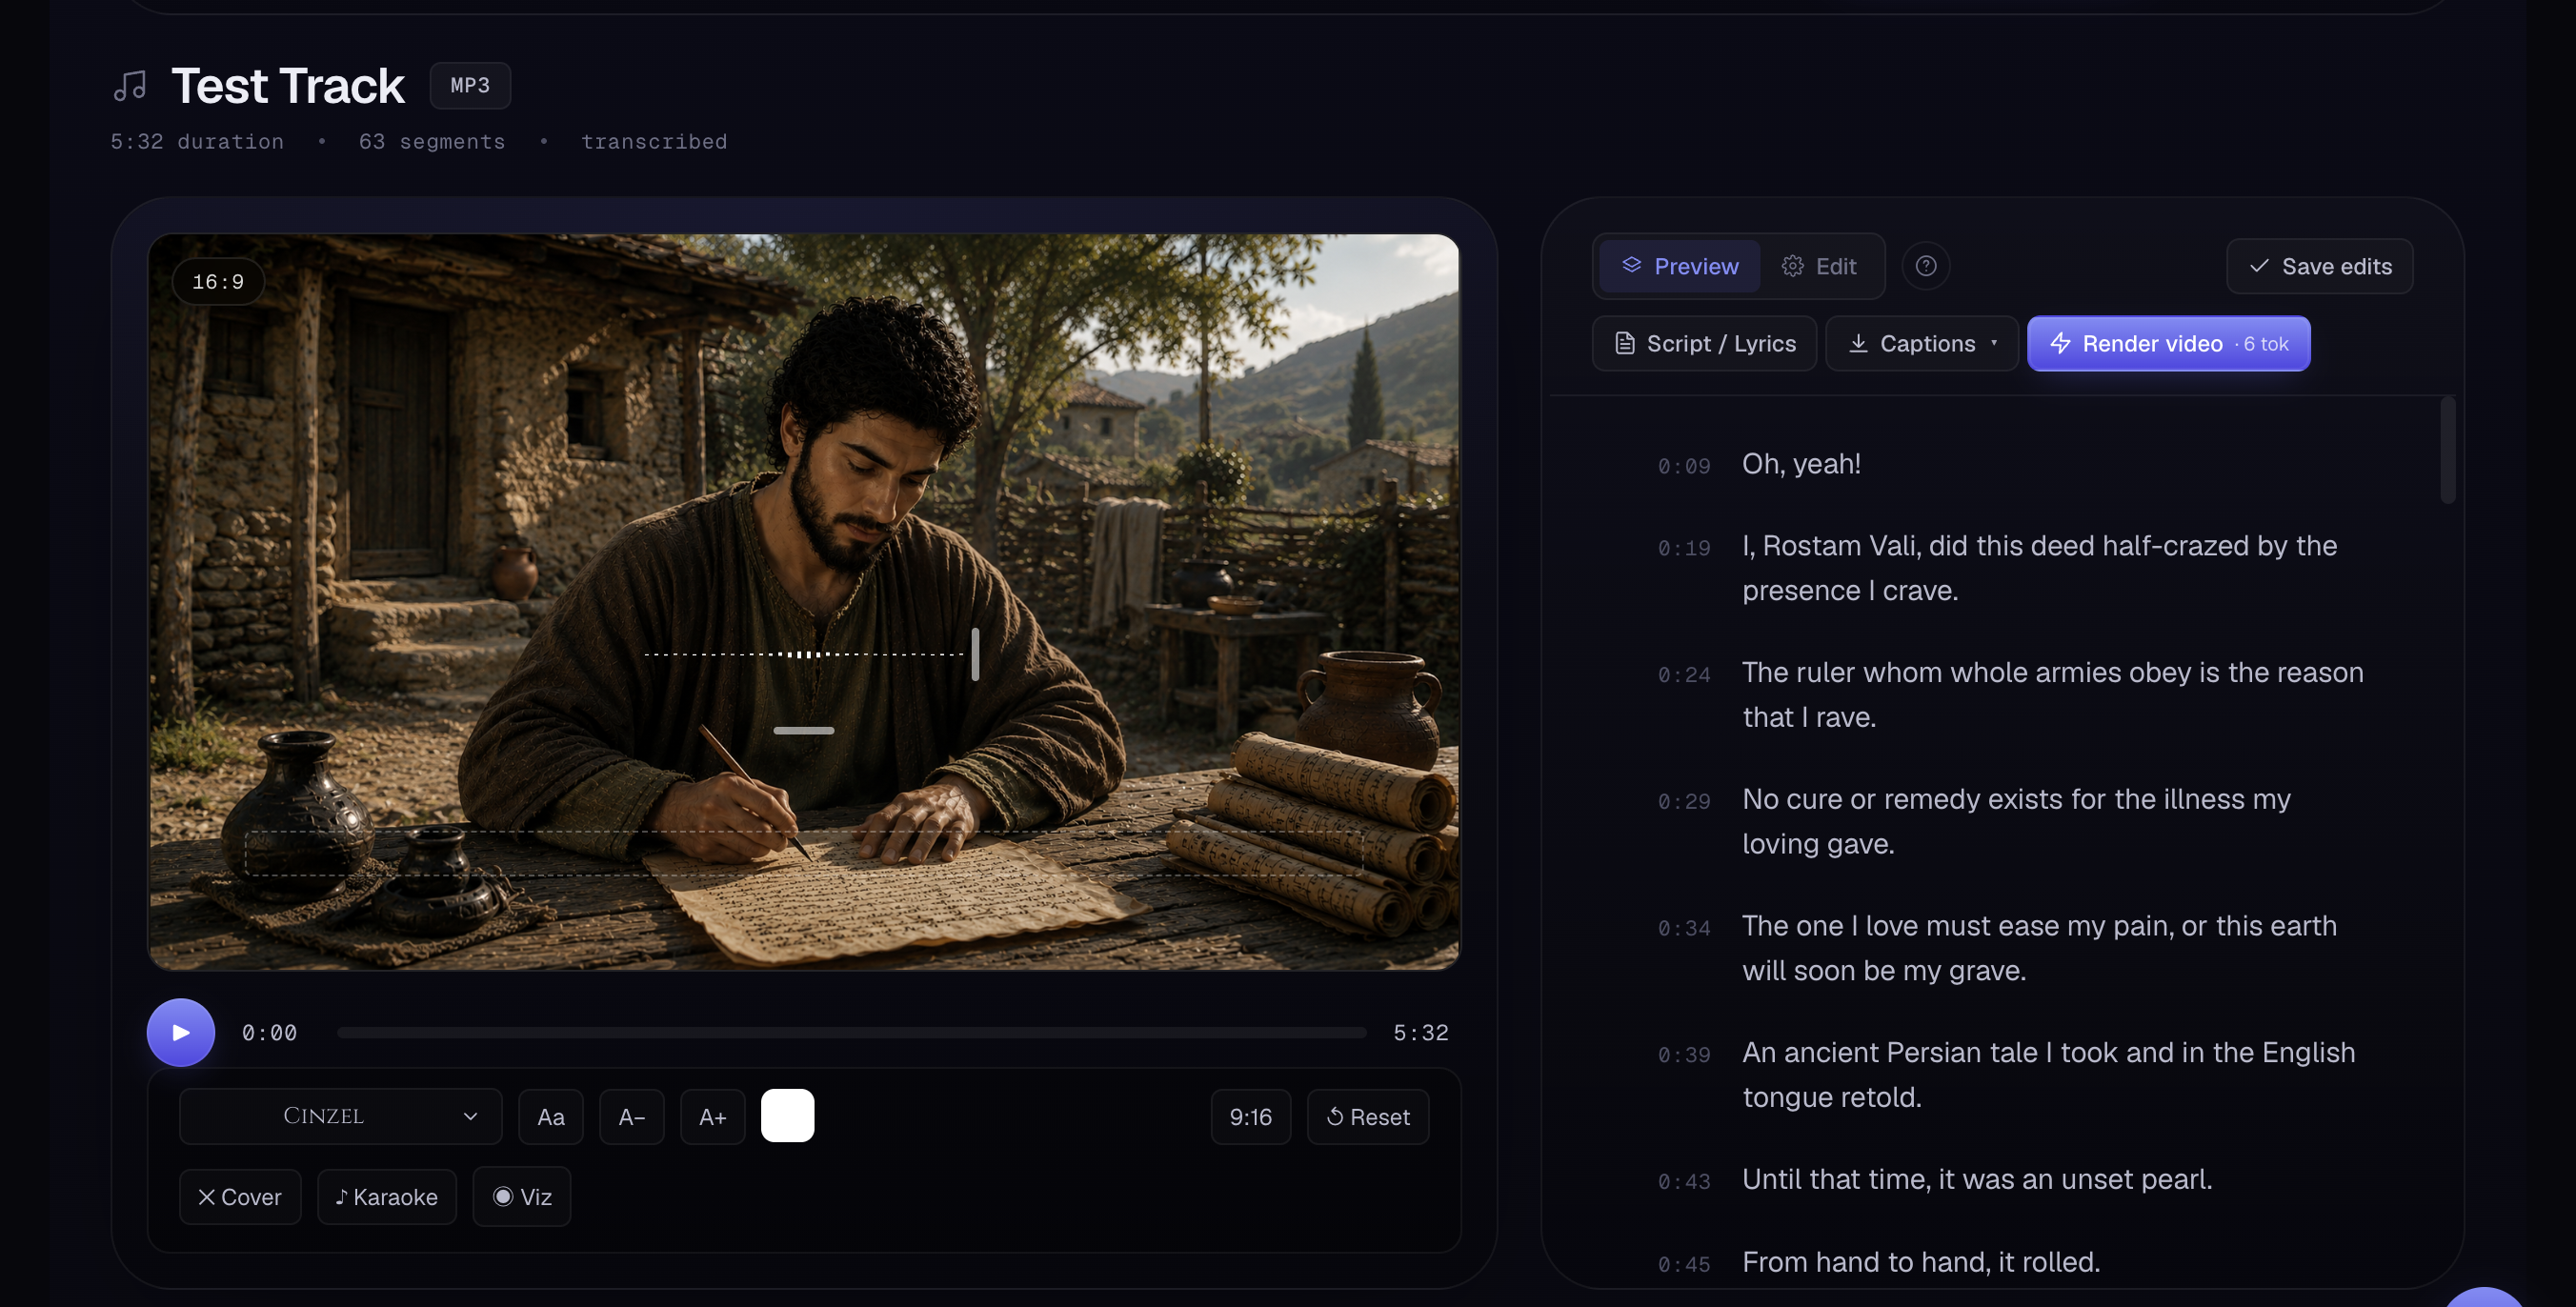 Screenshot 01 — the editor with a project loaded (player on the left, captions on the right)
Sign in
Open the app and sign in. You can Continue with Google, or enter your email to get a 6-digit code — paste the code and you're in. New accounts start on the Free plan automatically, with monthly tokens to try everything.
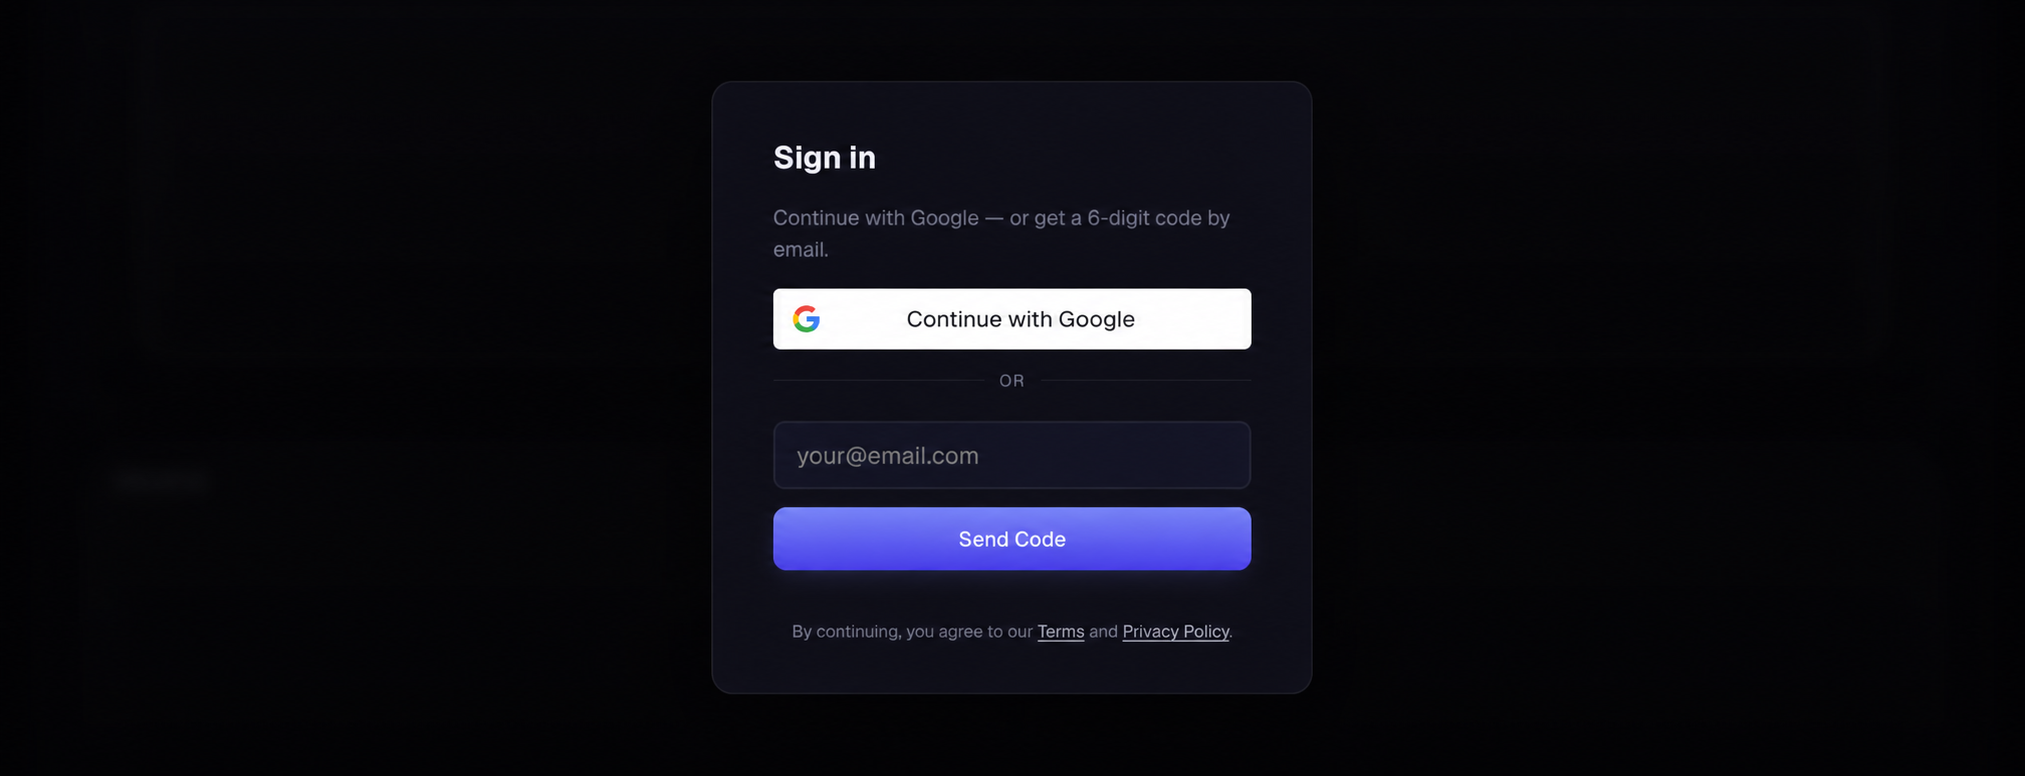 Screenshot 02 — the sign-in dialog (Google + email code)
Upload a file — or paste a Suno link
On the start screen you'll see two tabs: Upload and Suno link.
Upload — drag a file onto the drop zone, or click to browse. CaptionFit accepts MP3, WAV, M4A and MP4 (and most common audio/video formats), up to 2 hours long. Video files keep their picture; audio-only files get a clean backdrop you can customise later.
Suno link — made your song with Suno? Switch to the Suno link tab, paste the song URL (suno.com/song/…), and click Get track. CaptionFit fetches the track, reads its lyrics, and captions it automatically — every line timed to the vocals, in any language. No transcription, no copy-pasting lyrics. The project opens already captioned and ready to design.
 Screenshot 03 — the Upload / Suno link import tabs
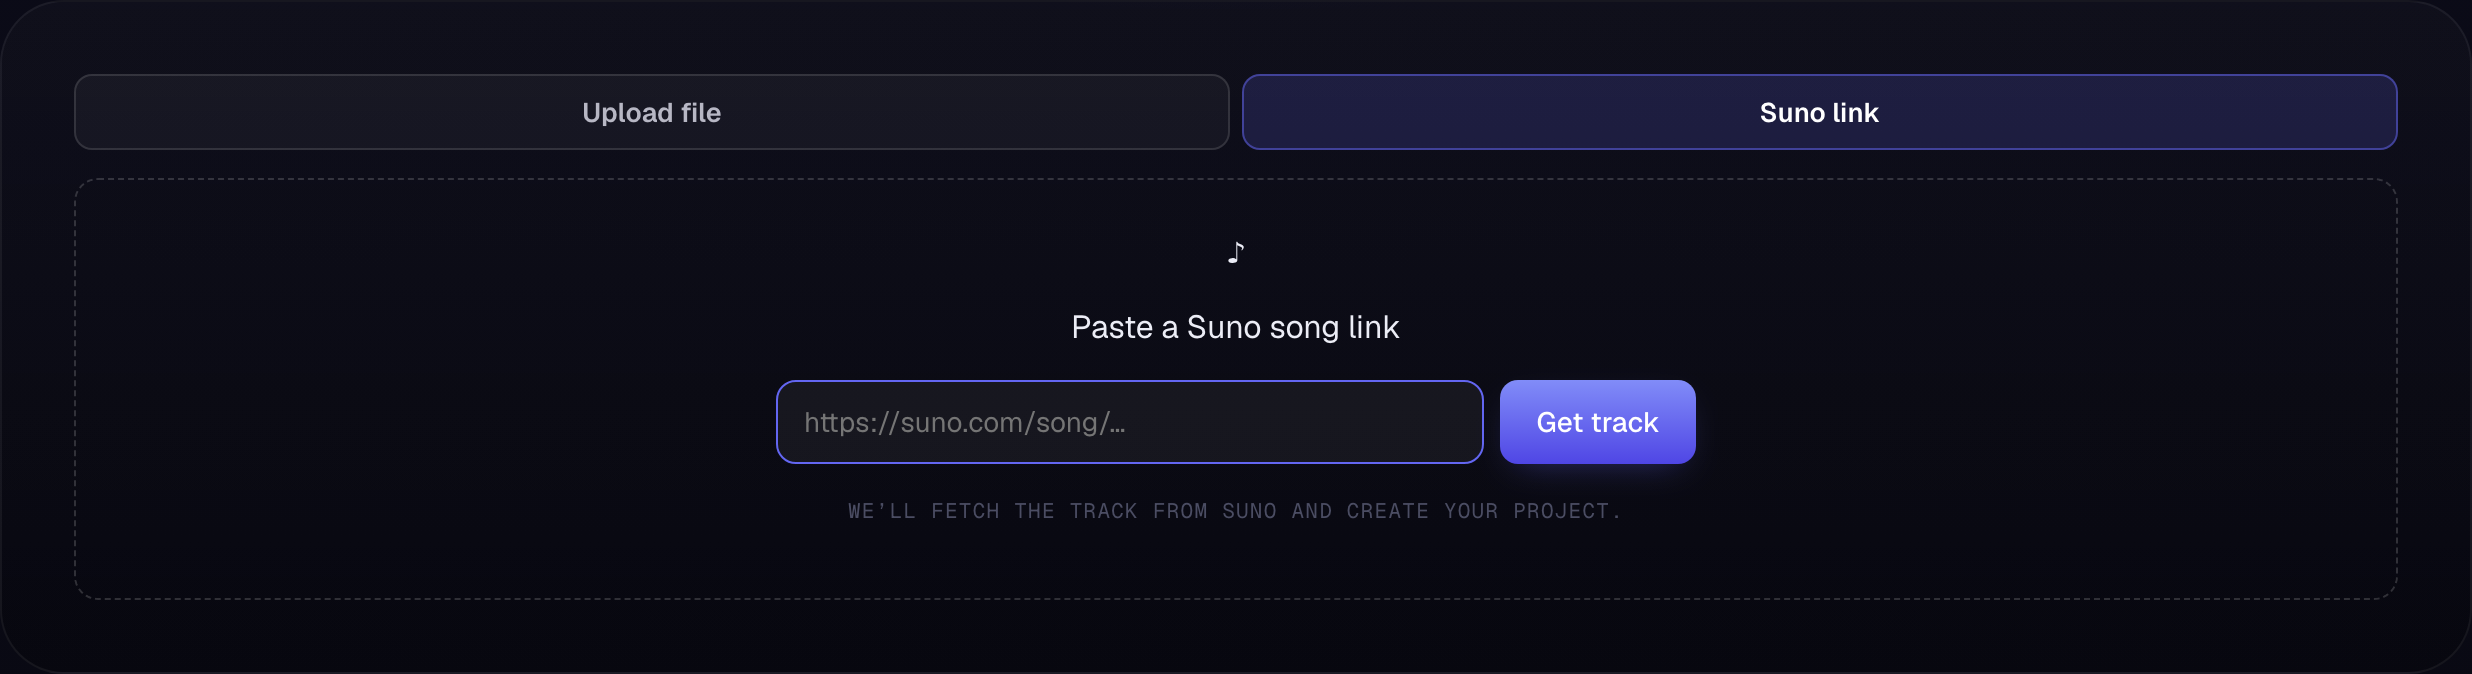 Screenshot 03b — paste a Suno song link to import and auto-caption it
Transcribe
Before transcribing, set two things:
- Language — pick the spoken language, or leave it to auto-detect.
- Caption length — the slider controls how many characters fit on a line. Shorter = punchier, social-style captions; longer = fewer, fuller lines.
Hit Transcribe. In a few moments your captions appear, each line timestamped to the audio.
 Screenshot 04 — language + caption-length controls and the Transcribe button
Review & edit captions
The caption list has two modes:
- Preview — a read-only timeline that scrolls along with the player. Click any line to jump straight to that moment.
- Edit — turns each line into an editable row so you can fix text and timing, insert, or delete.
Editing a caption row
- Start / End — type a timestamp directly, or click SET to stamp the current player position. Neighbouring rows snap to avoid overlap.
- Text — click the line and type. Press Enter or click away to confirm.
- + inserts a new caption below the current one; 🗑 deletes it.
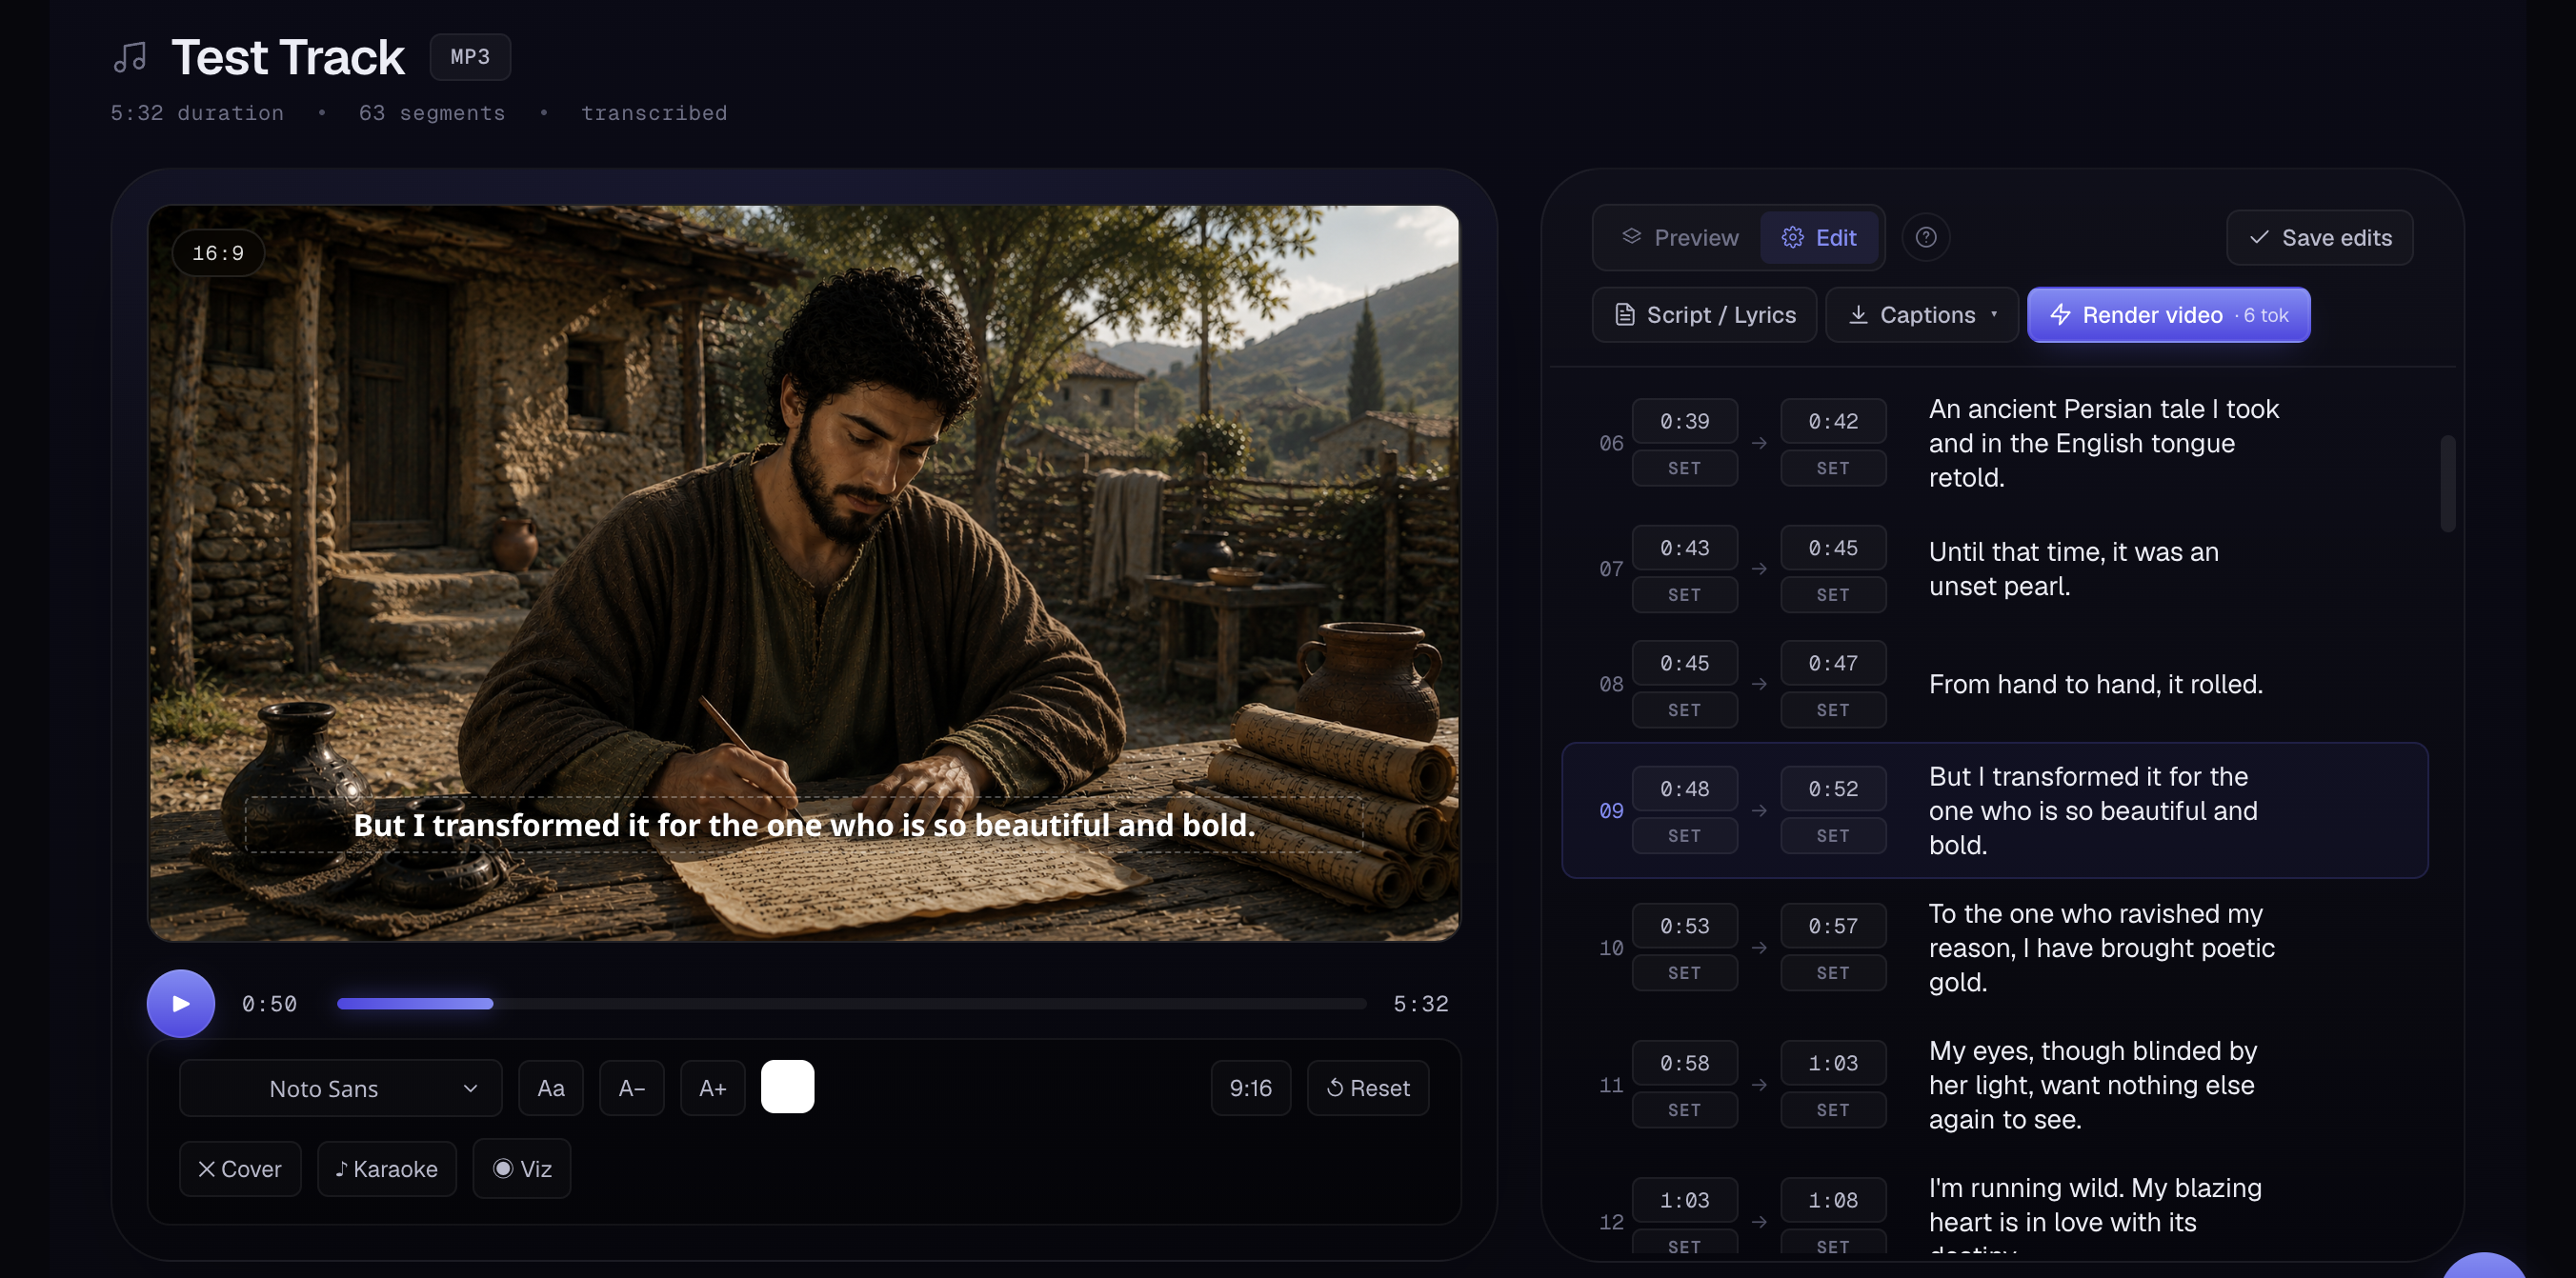 Screenshot 05 — Preview/Edit toggle and an editable caption row (Start/End, SET, text, +, 🗑)
Fix with Script / Lyrics
If transcription mis-heard names, lyrics, or technical terms, open Script / Lyrics and paste the correct text (one line per caption). Two modes:
- Fix spelling — keeps your existing splits and timing, but corrects the words against your script.
- Fix spelling & re-segment — also re-splits the captions so each line of your pasted text becomes one caption. Best for song lyrics or scripted dialogue.
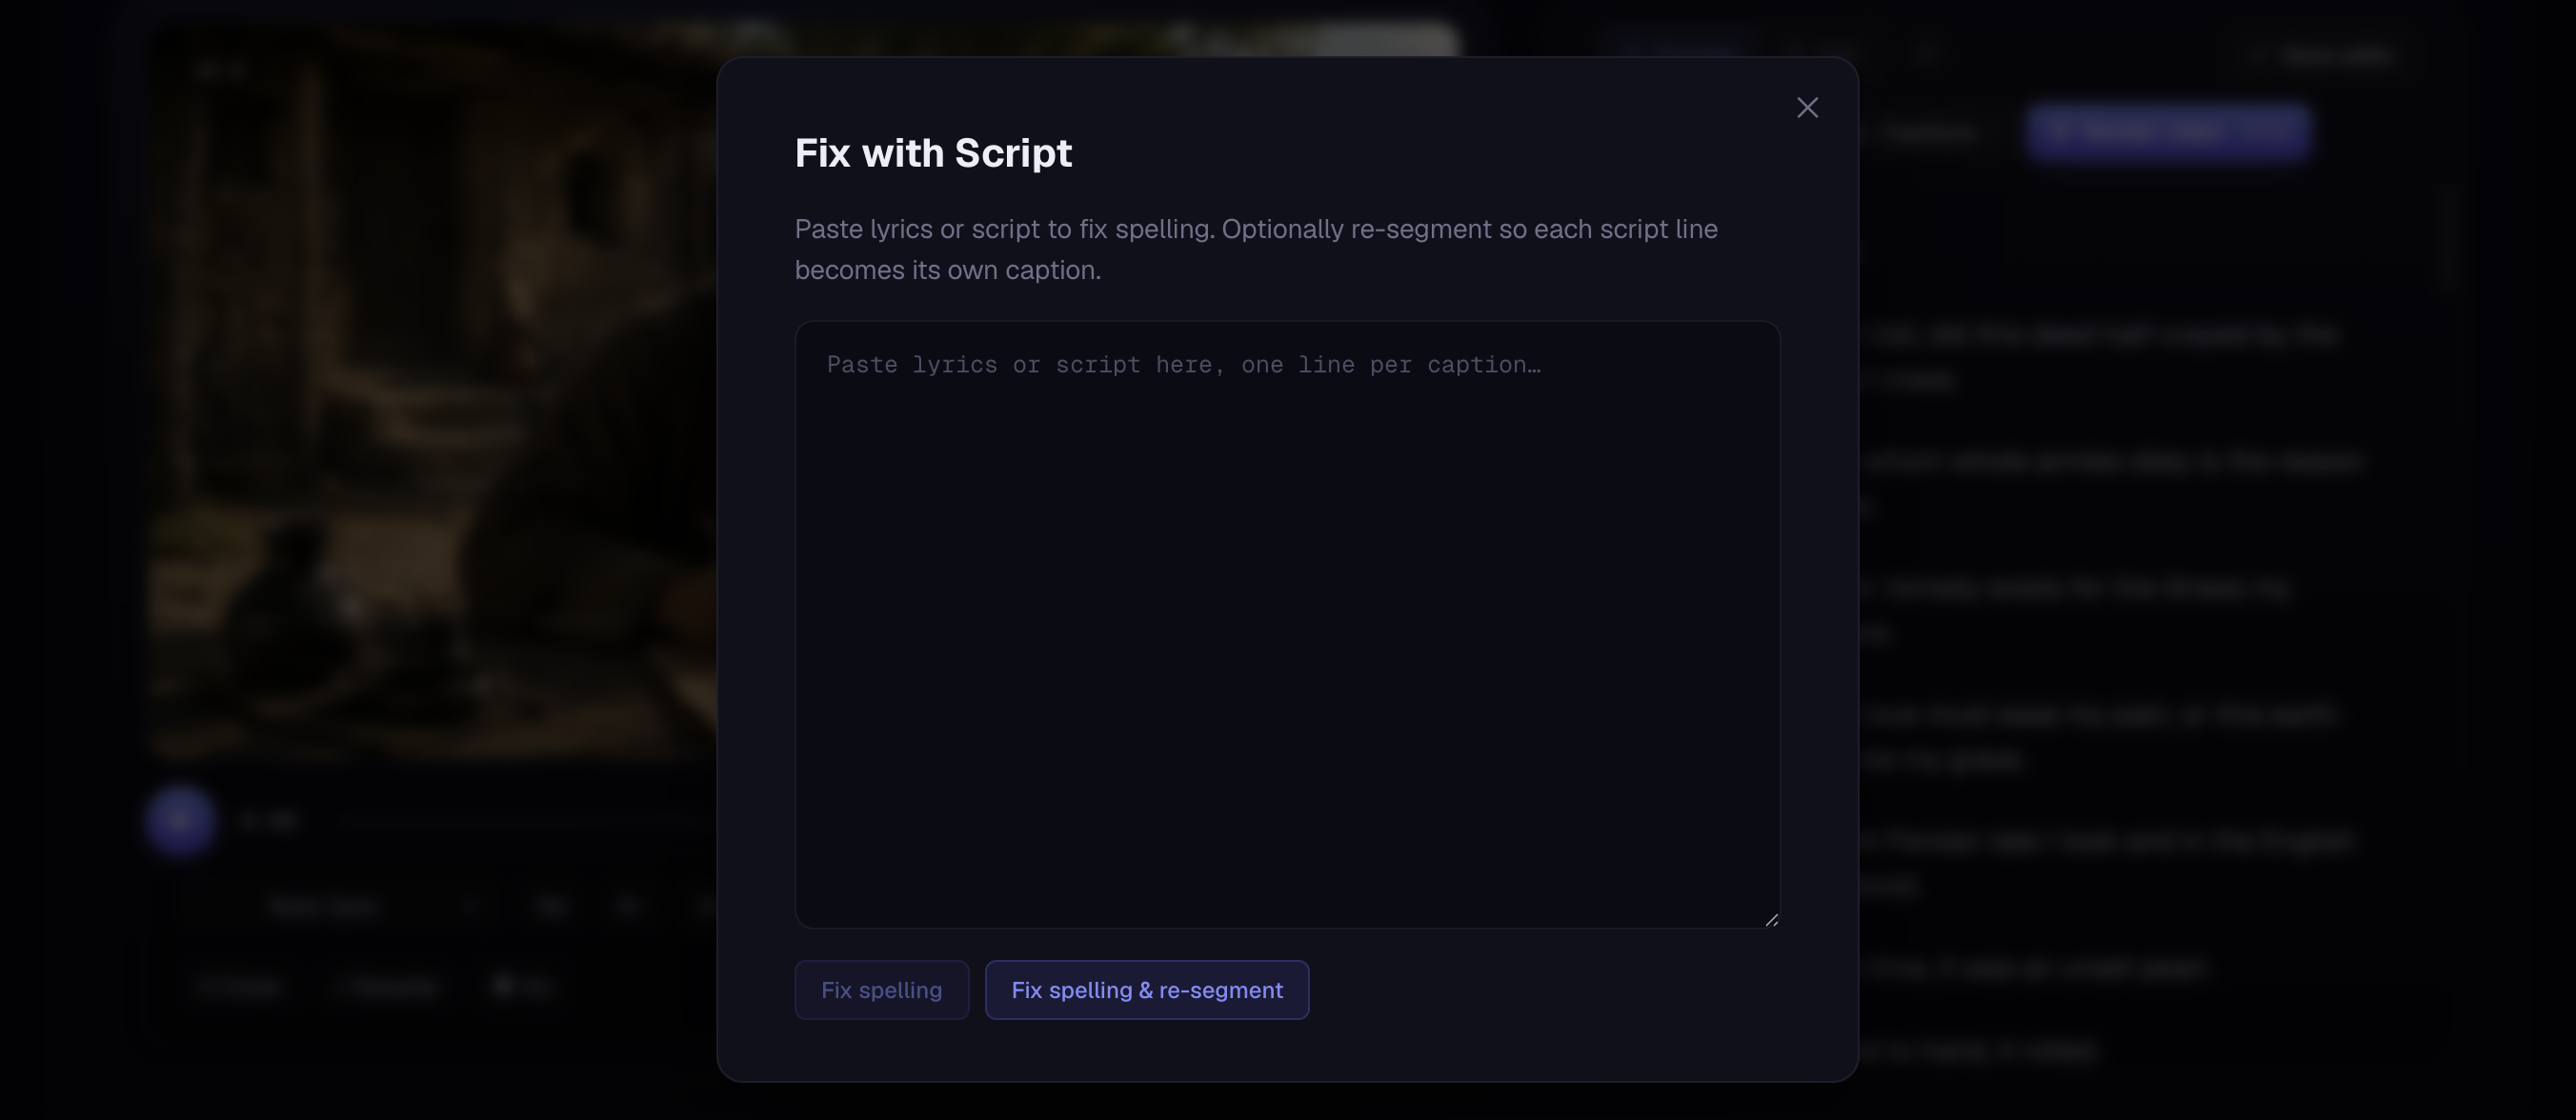 Screenshot 06 — the Script / Lyrics dialog with the two fix buttons
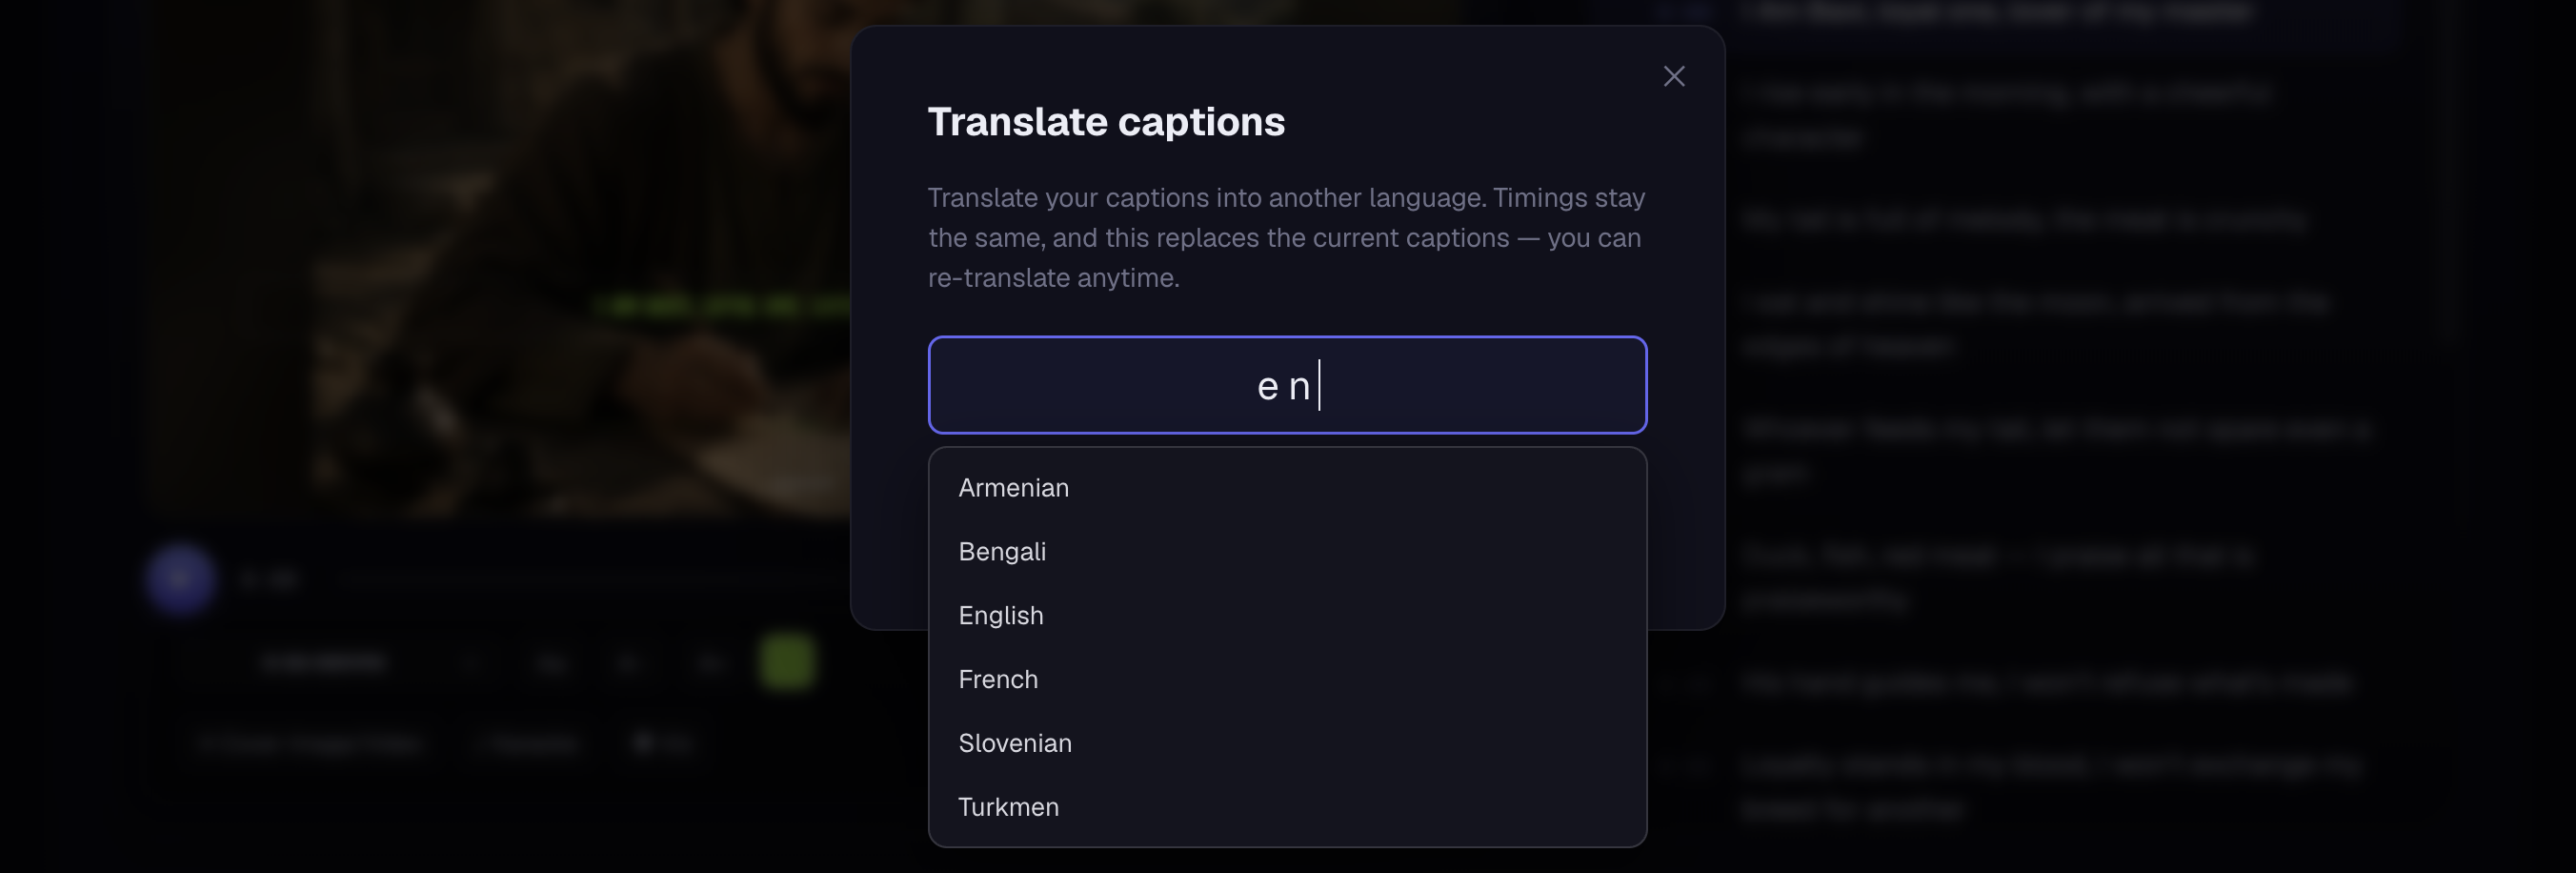
Translate your captions
Reach a wider audience by translating your captions into another language. Click Translate (next to the Preview / Edit toggle), search the list of 100+ languages, pick one, and press Translate. The source language is detected automatically — you only choose the target.
- Timings stay exactly the same, so your video stays perfectly in sync.
- The translation replaces the captions on screen so you can design and render them like any other project. Your original is kept — re-translating always works from it, so you can produce several languages from one project.
- It works with every caption style, including word-by-word karaoke and all fonts.
Translating costs 1 token per minute of audio (the exact amount is shown on the Translate button before you confirm).
 Screenshot — the Translate dialog with the searchable language list
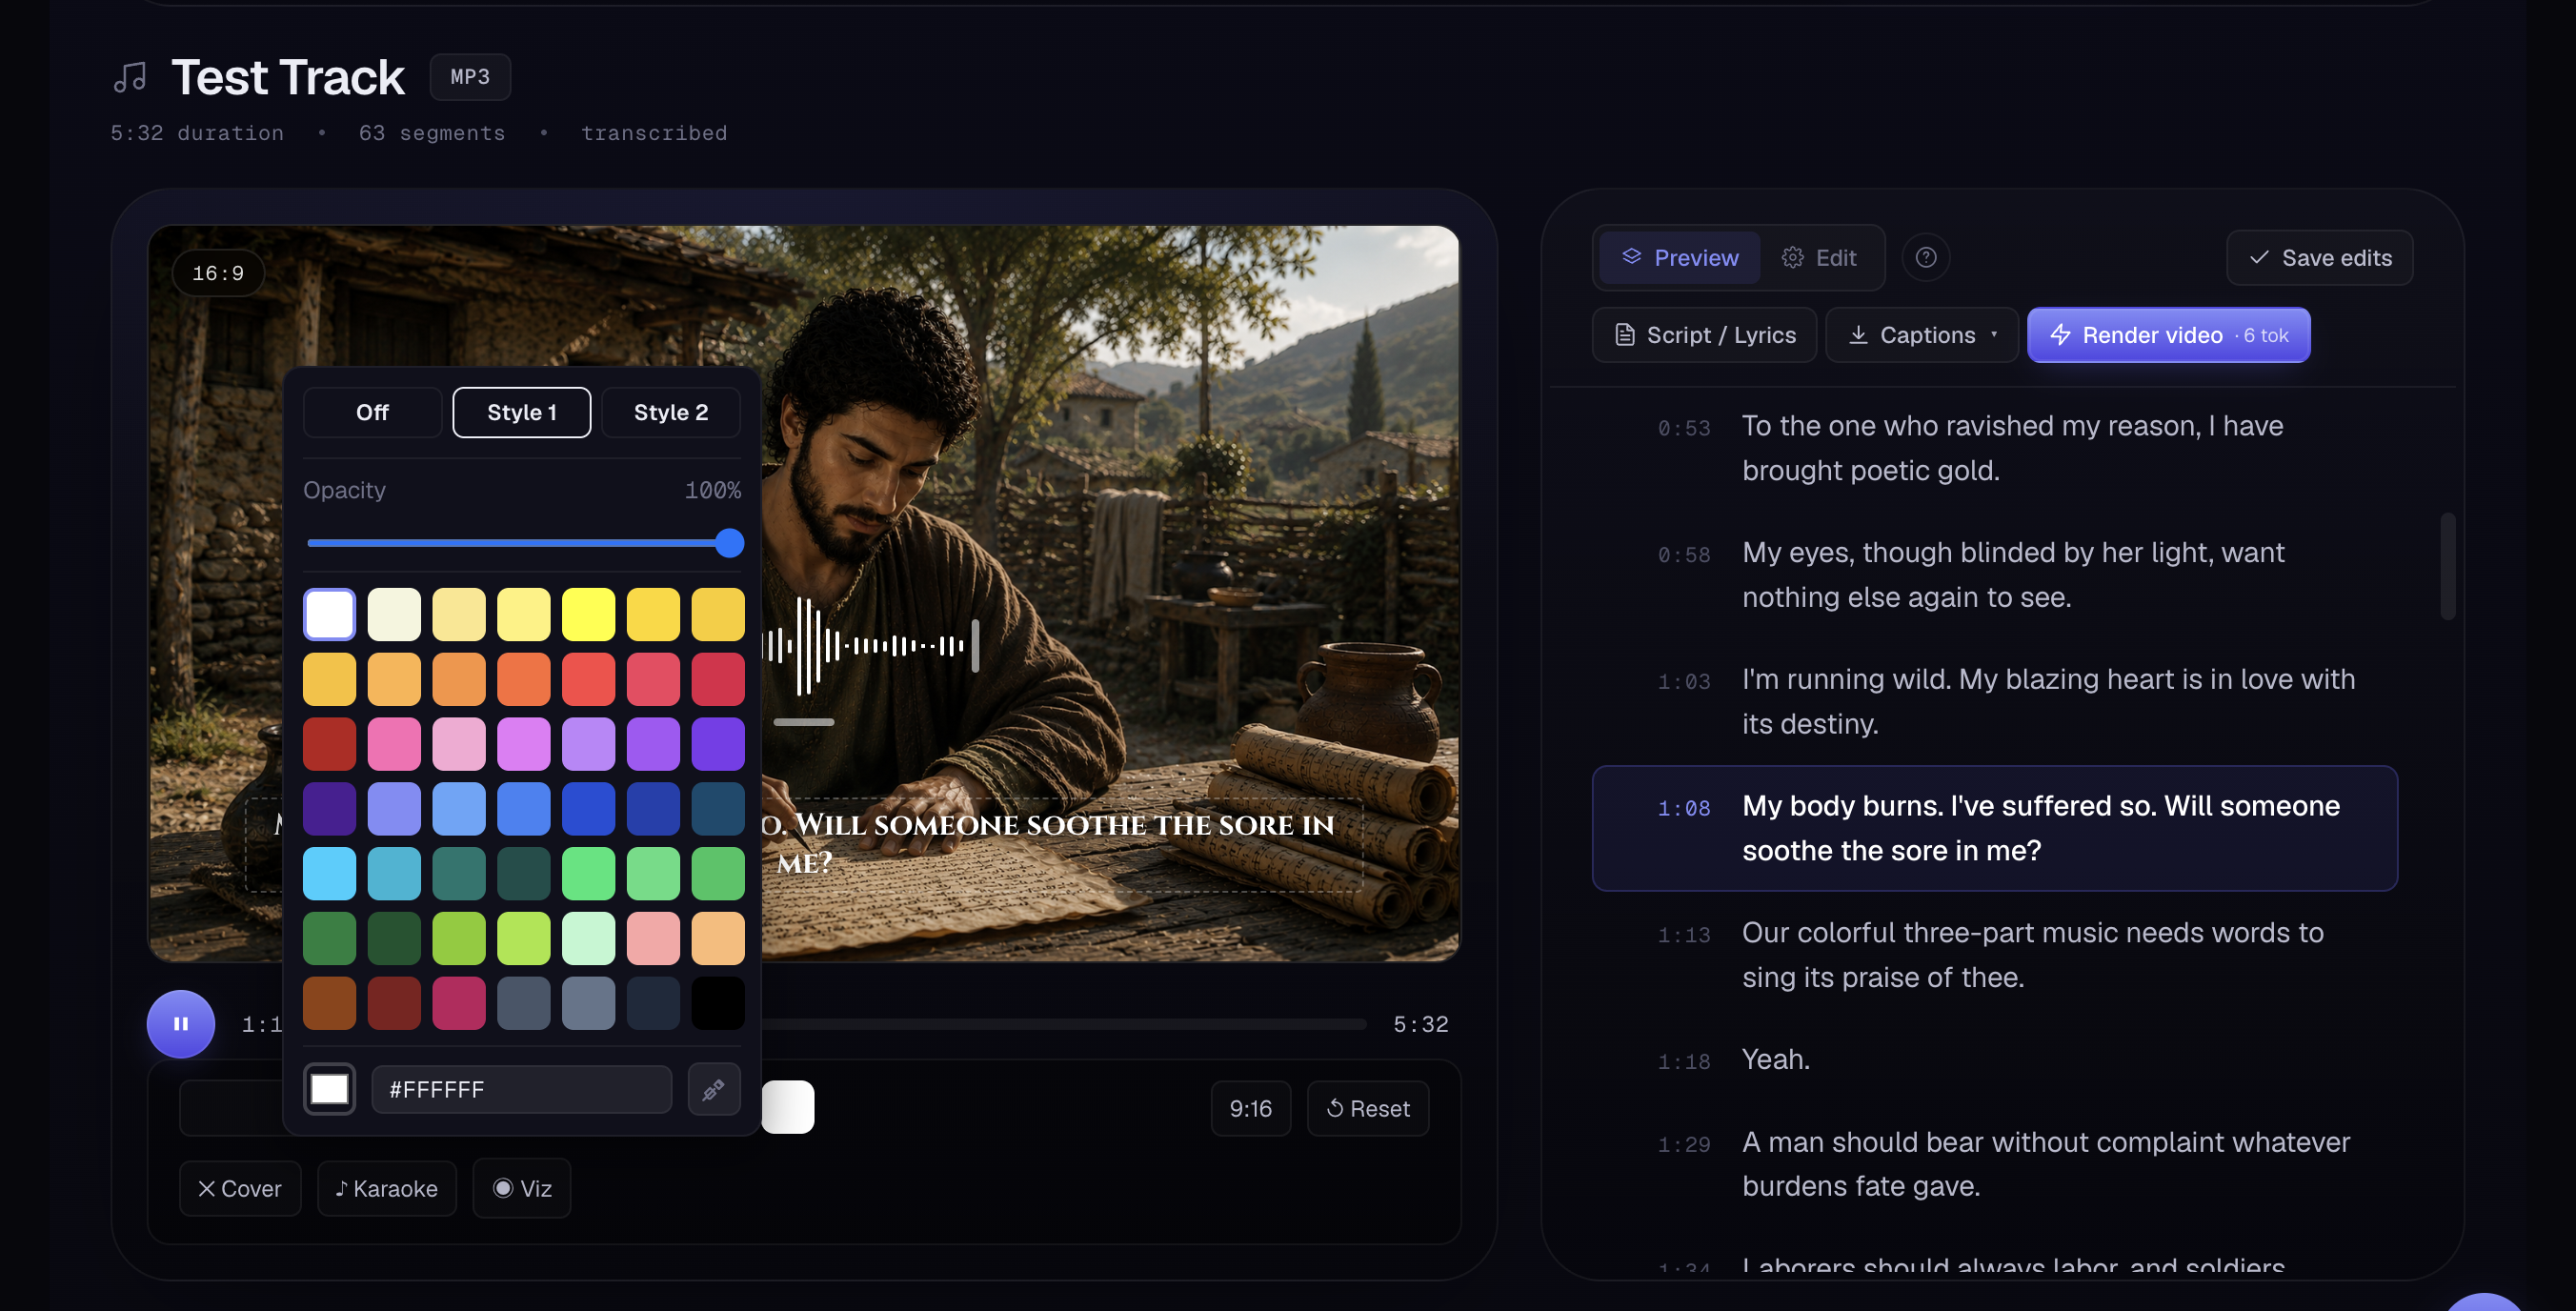
Design your captions
Make the captions match your brand. Everything updates live in the preview player:
- Font — pick from the font menu (dozens of styles, grouped by category).
- Size & color — scale the text and choose its colour.
- Aspect ratio — 9:16 (vertical / Reels & TikTok) or 16:9 (widescreen / YouTube).
- Position & case — move the caption band up or down, and force UPPERCASE / lowercase if you like.
 Screenshot 07 — the font picker open + size / colour / aspect-ratio controls
Audio visualizer (optional)
For audio-only projects, add a moving audio visualizer — animated bars that react to the sound. Choose a style, colour, opacity and position, or turn it off entirely. Great for podcast clips and music snippets.
 Screenshot 08 — visualizer style / colour / position controls
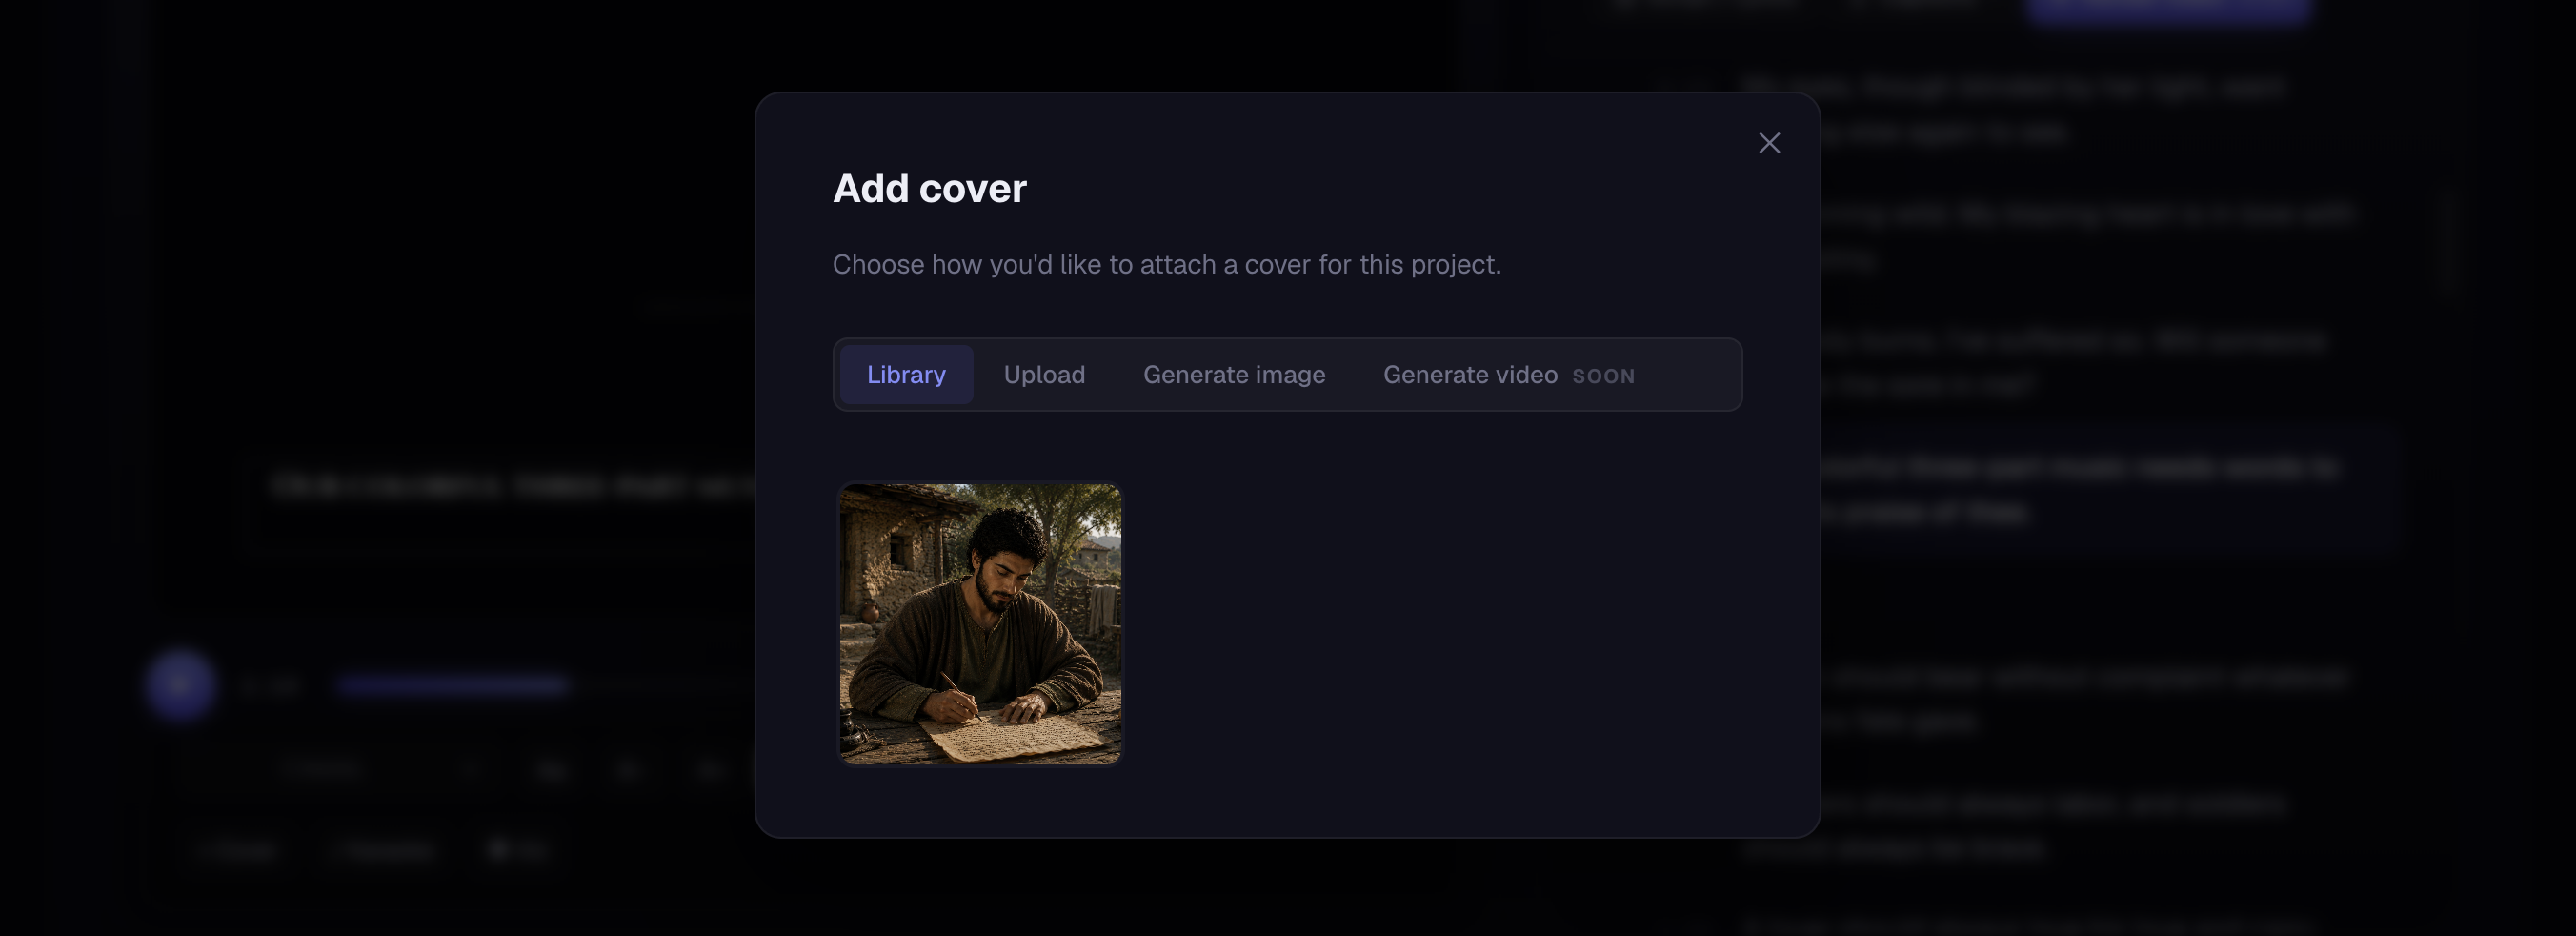
Add a cover image or video
Give an audio project a background. Open + Cover and choose:
- Library — reuse an image or video you've added before.
- Upload image — bring your own photo or artwork.
- Upload video — use a short video clip as the background; it loops seamlessly for the full duration of your render.
- Generate image (AI) — describe the cover you want and let AI create it.
The app blurs and dims a copy behind your captions automatically, so text stays readable on any cover — whether it's a still image or a looping video.
 Screenshot 09 — the cover chooser (Library / Upload / Generate image)
Render the video
When it looks right, click Render video. CaptionFit burns the captions onto the video using your chosen font and style, and renders it in your selected aspect ratio. When it's done you can preview it in the app and download the MP4.
captionfit.com badge in the corner. Any paid plan
renders clean, with no watermark.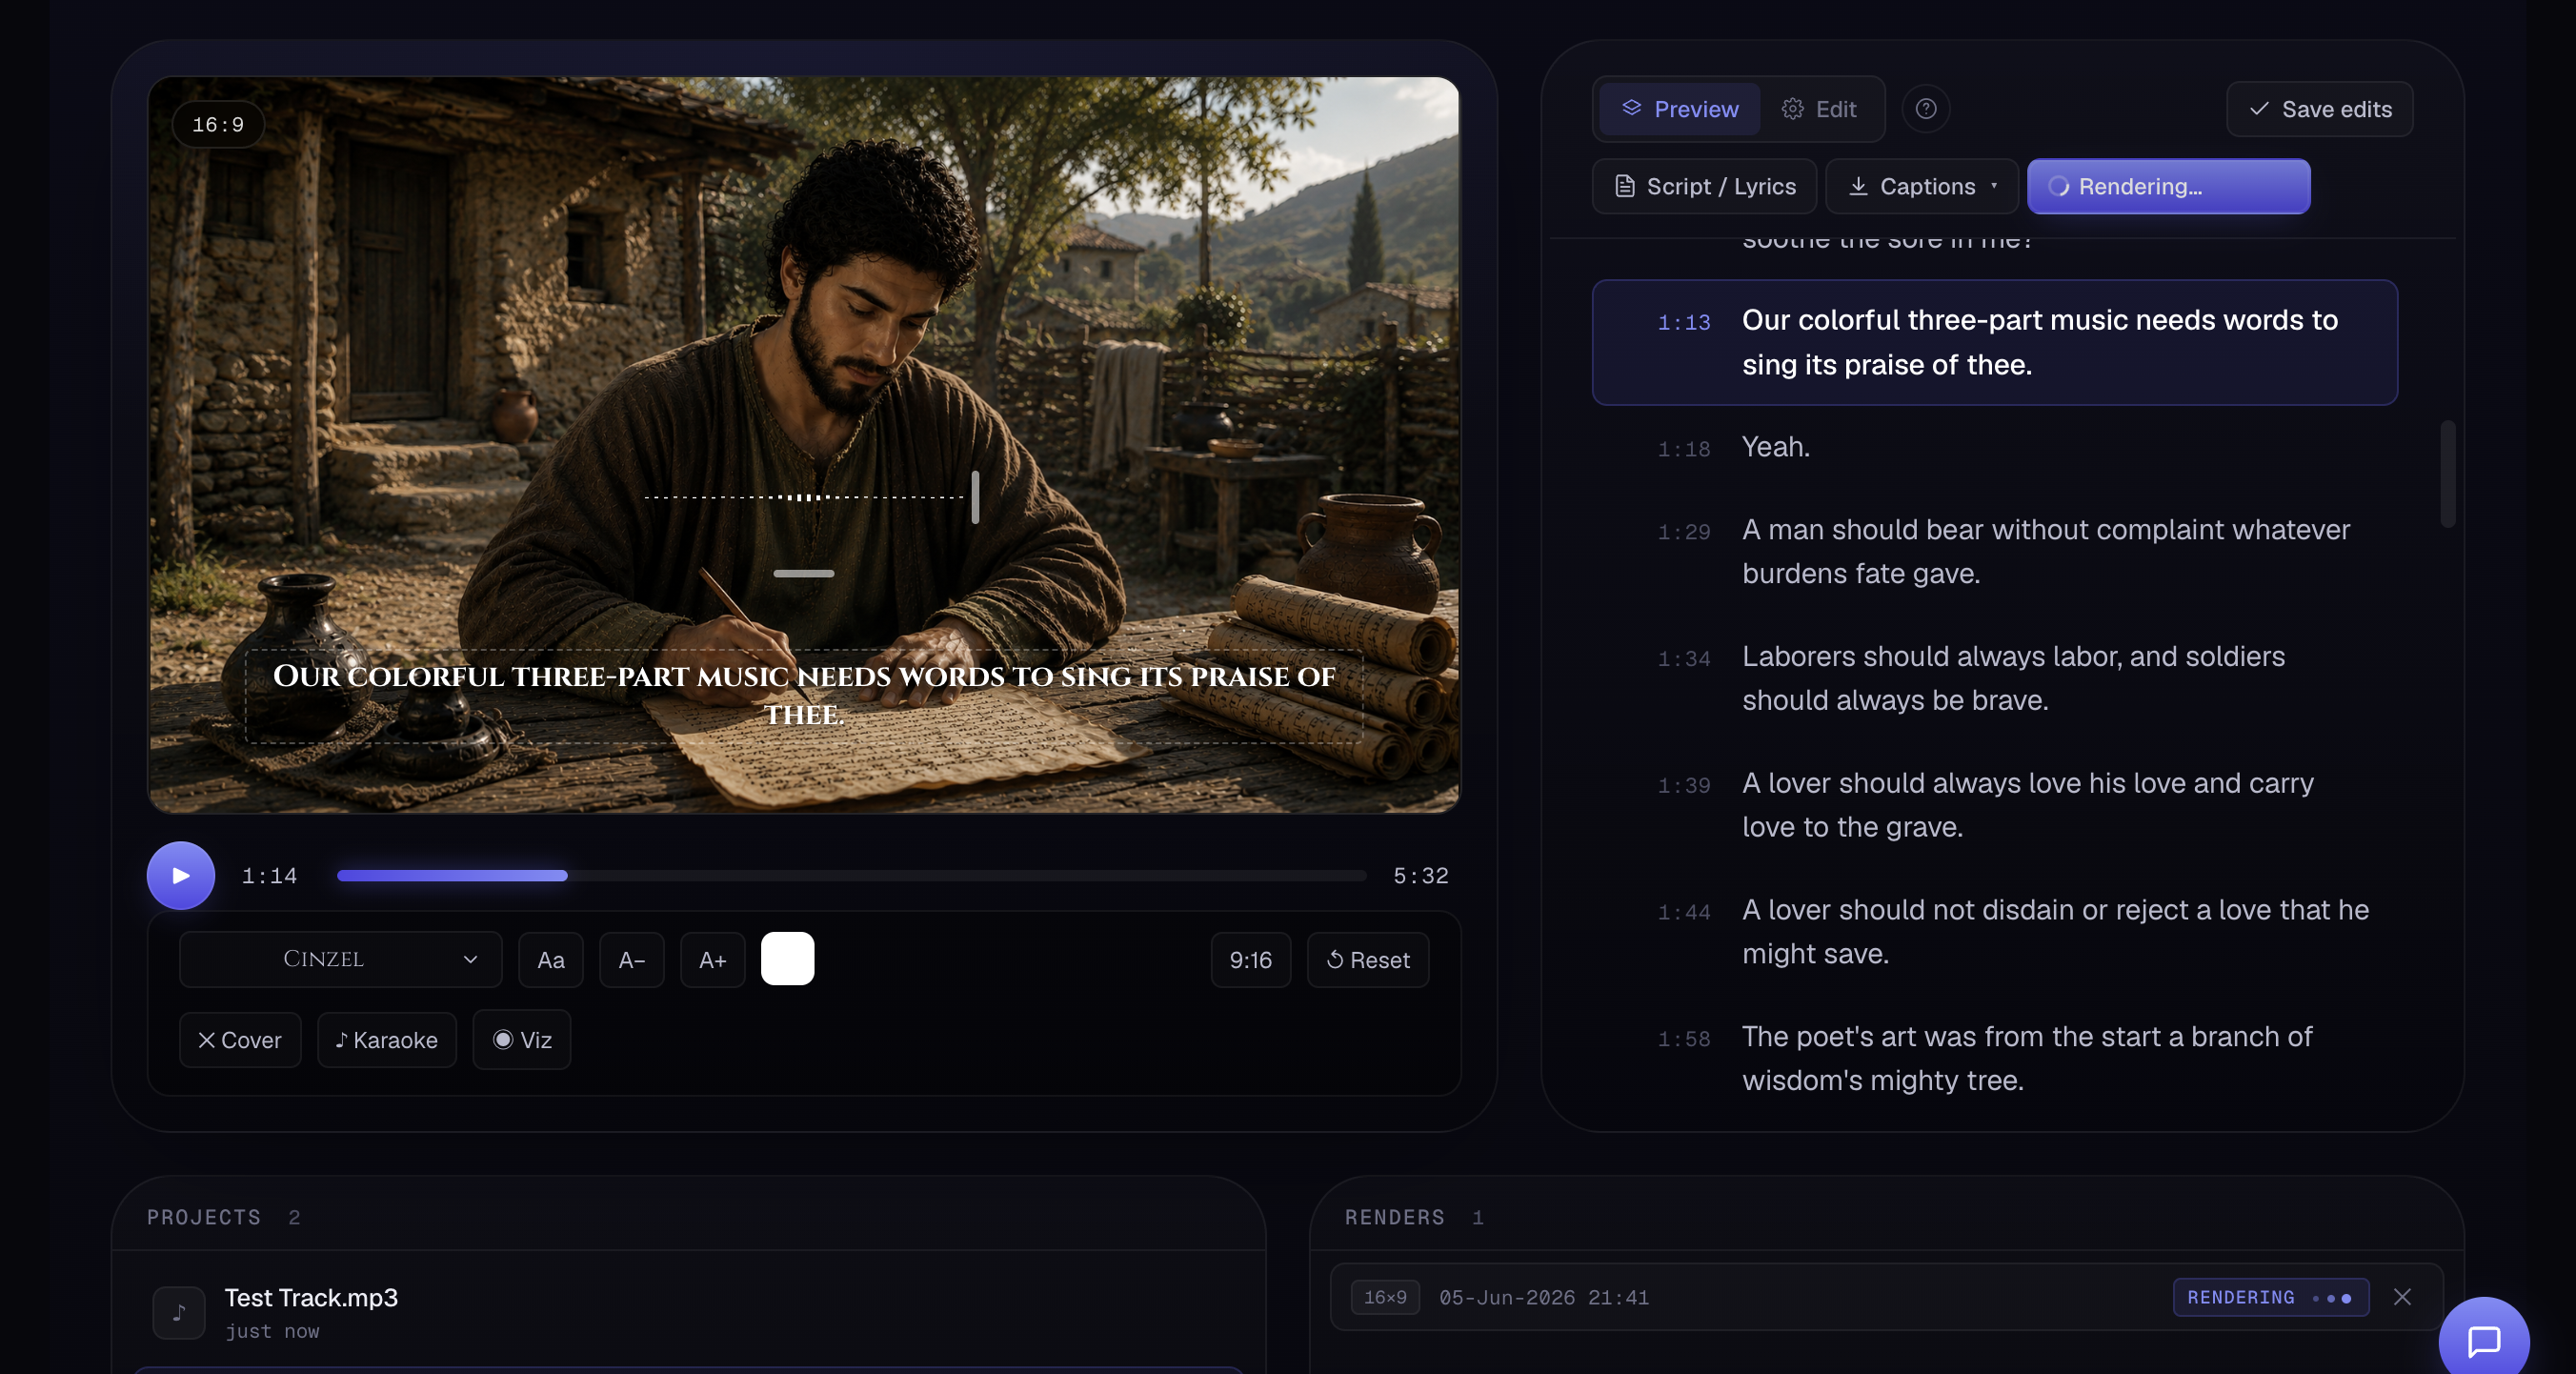 Screenshot 10 — the Render video button and the finished-render preview / download
Download subtitles instead
Don't need a rendered video? Open Captions and export just the subtitle file — SRT, WebVTT, TTML, or styled ASS. Drop it into your own editor (Premiere, Final Cut, DaVinci, YouTube, etc.).
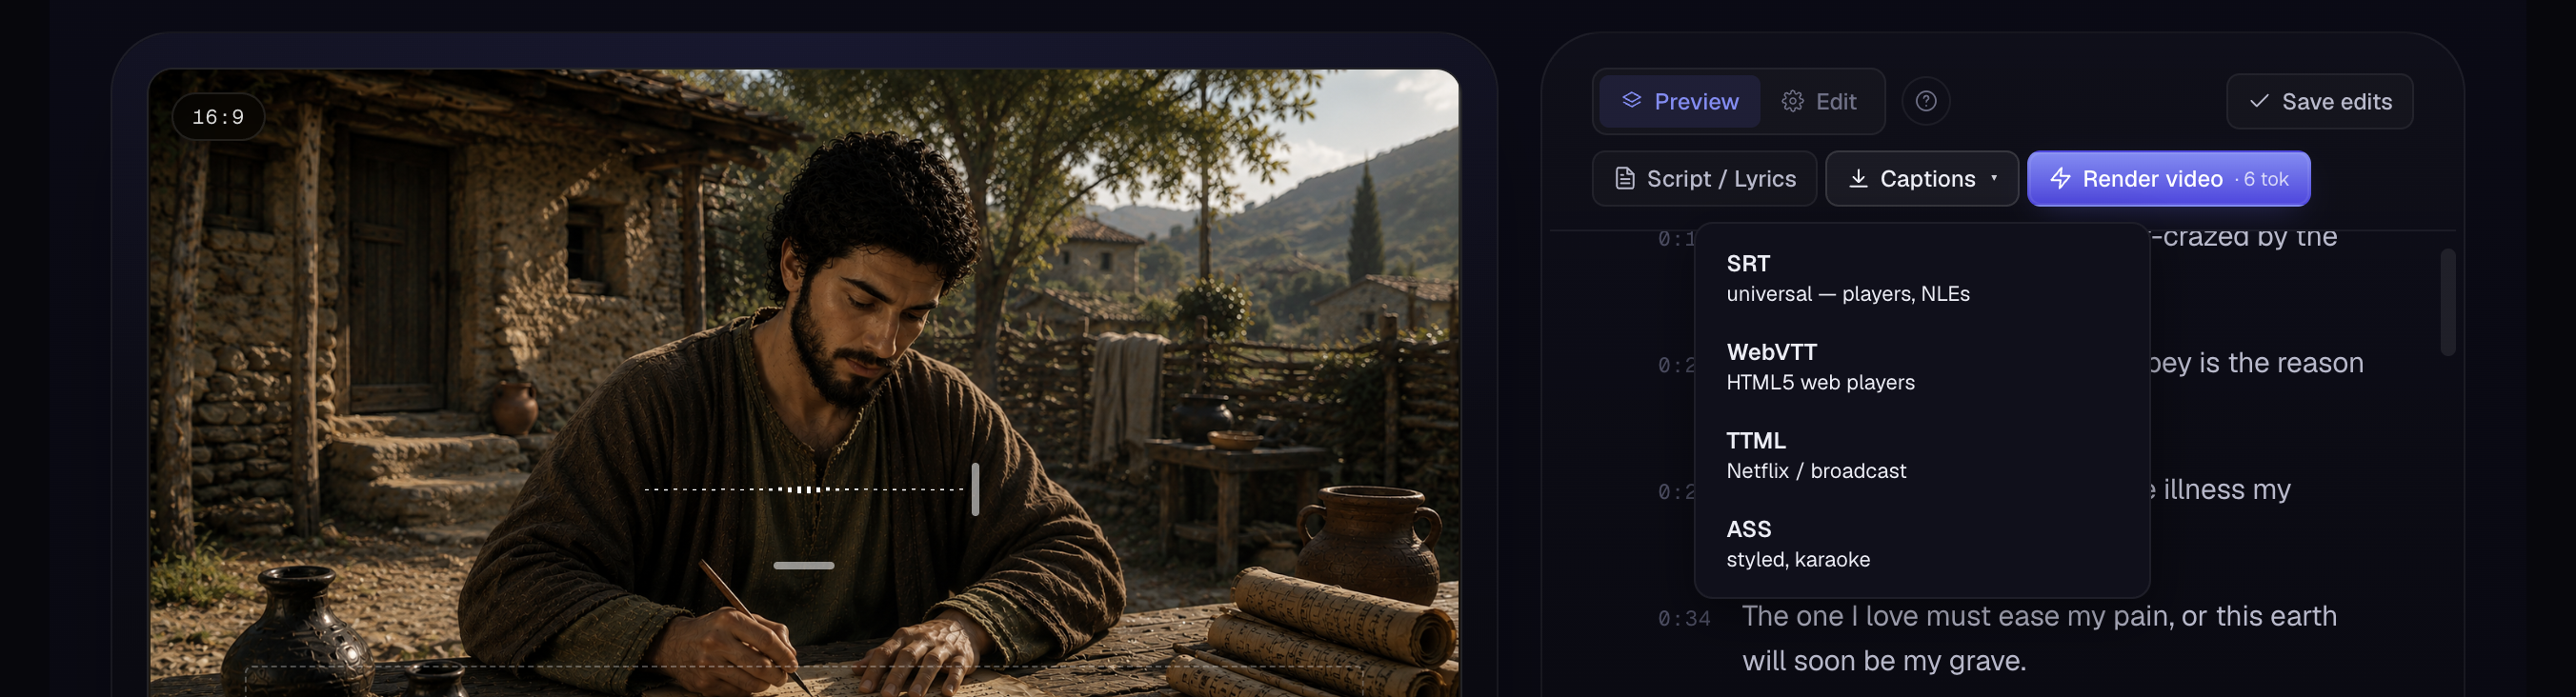 Screenshot 11 — the Captions export menu (SRT / VTT / TTML / ASS)
Your projects
Every file you transcribe is saved as a project. Reopen it any time to keep editing, re-export, or re-render — your captions, design and cover are all remembered. Start a fresh one with + New Project.
 Screenshot 12 — the saved-projects list
Tokens & plans
CaptionFit runs on tokens. Each plan includes a monthly token allowance that refreshes automatically:
- Transcribe and Render each cost about 1 token per minute.
- AI cover image costs a few tokens per image.
- Script / Lyrics fixing is free.
The Free plan is great for trying things out (rendered videos carry a small watermark). Pro and Expert add more monthly tokens and render without a watermark. Manage your plan, see your token history and invoices on the Plans & billing page.
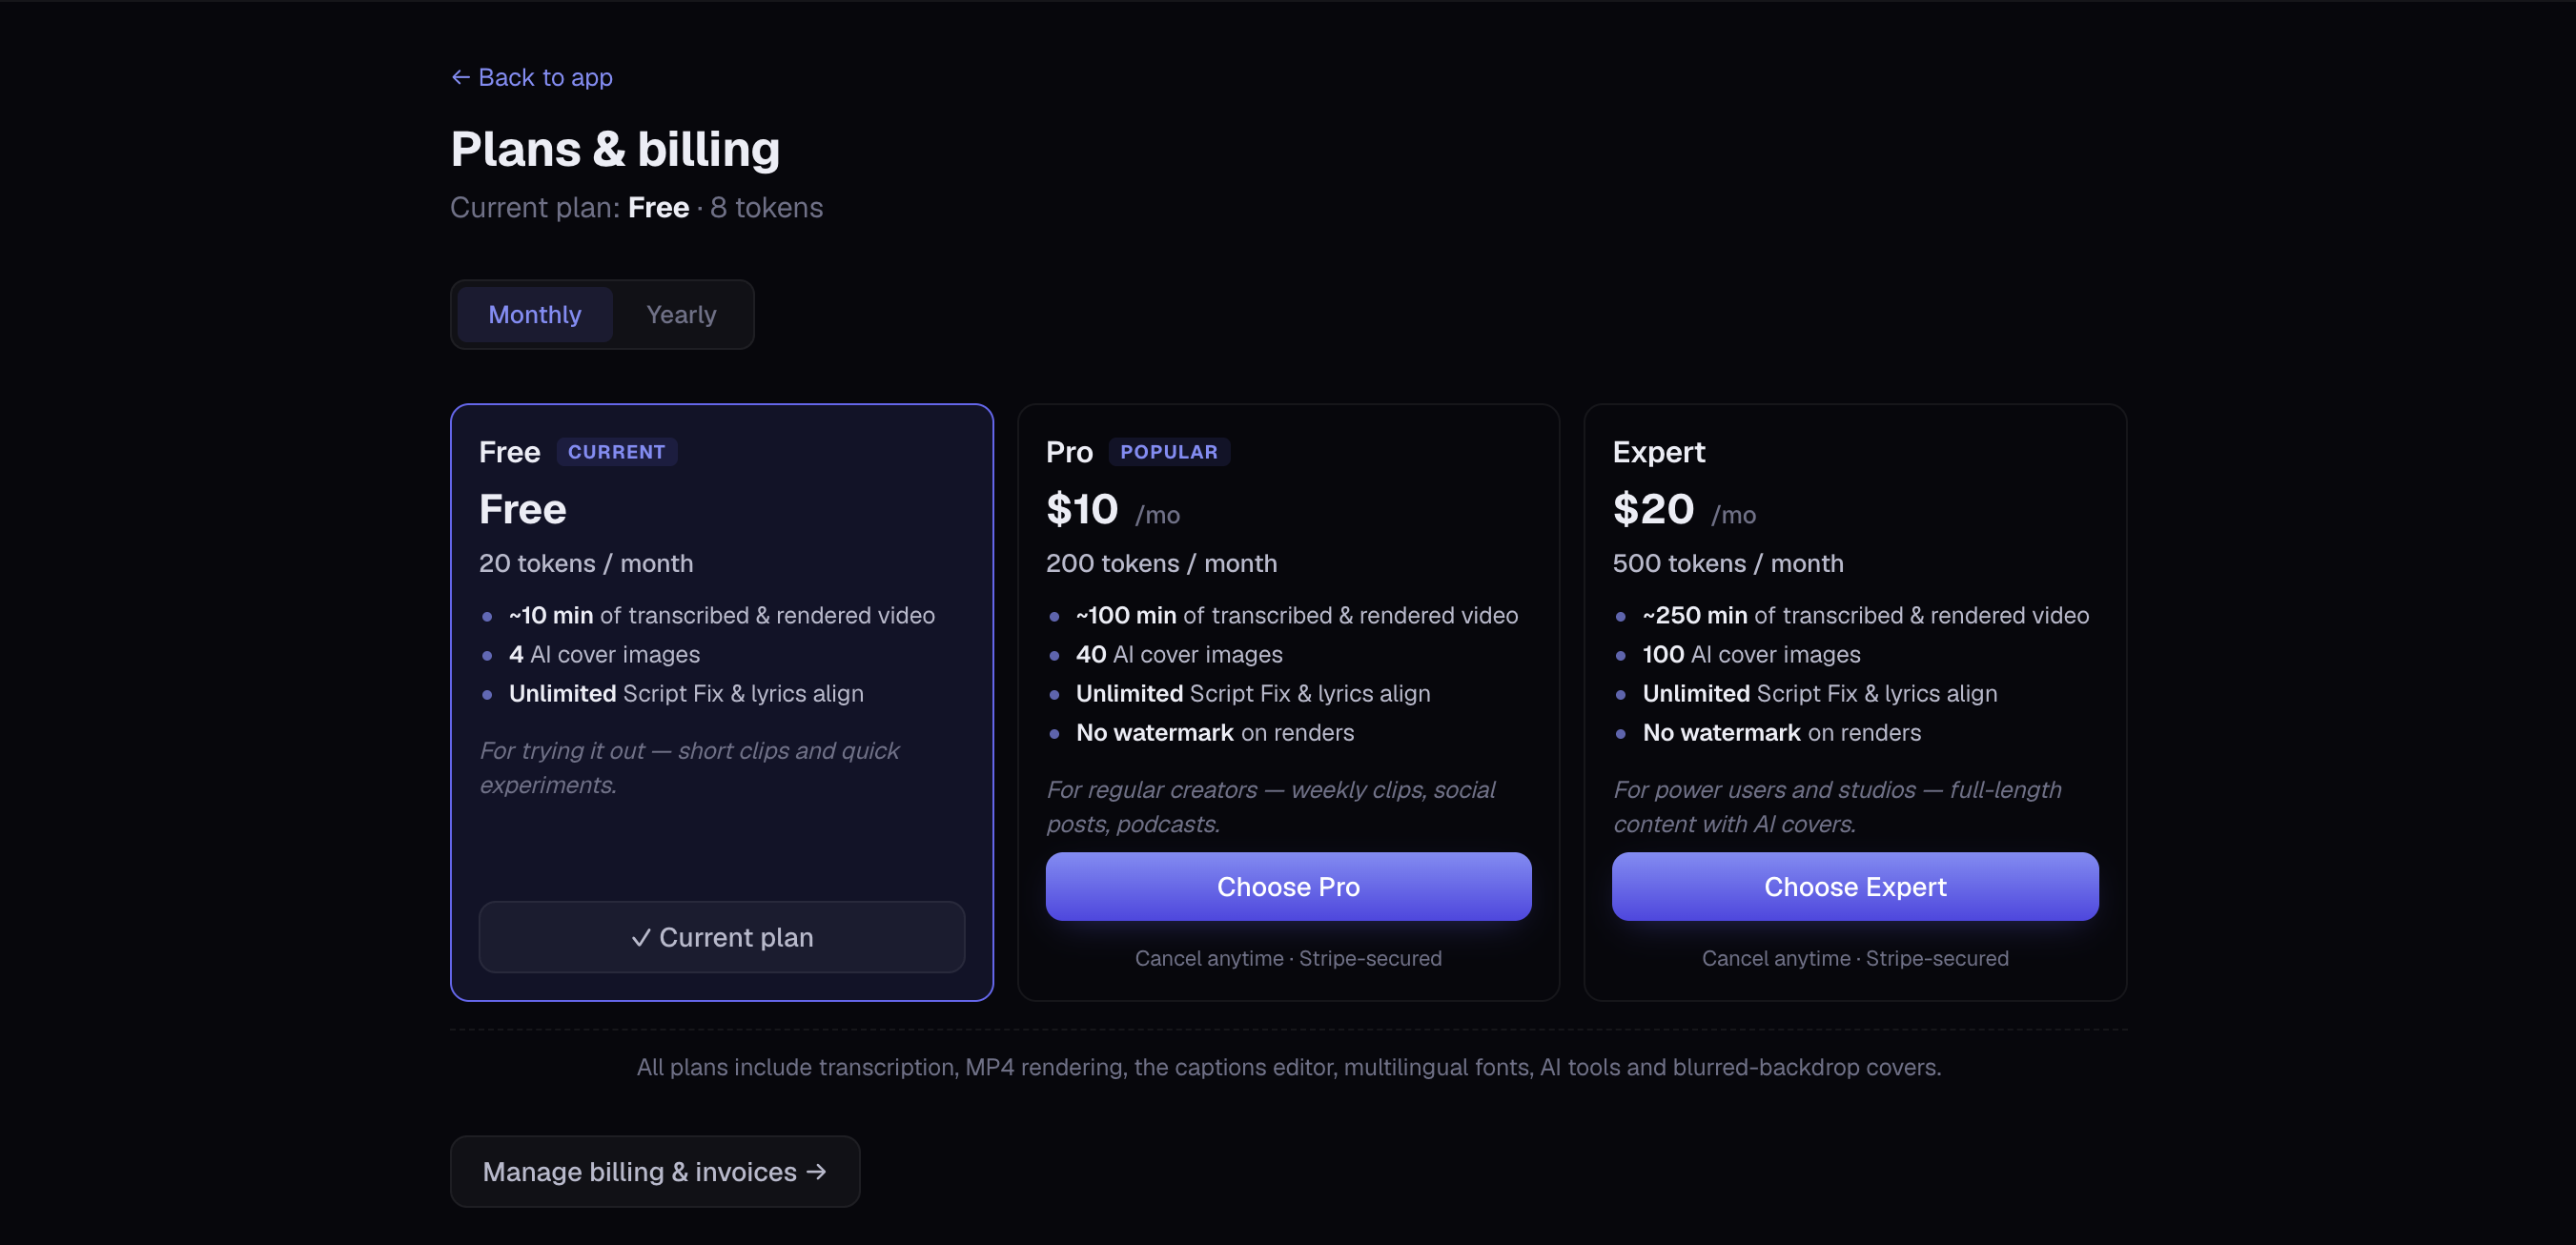 Screenshot 13 — the Plans & billing page (plan cards + token balance)
Quick answers
What file types can I upload?
MP3, WAV, M4A, MP4 and most common audio/video formats, up to 2 hours.
Can I fix wrong words without re-recording?
Yes — edit any caption directly, or paste your script in Script / Lyrics to auto-correct the whole transcript.
Vertical or widescreen?
Both — switch between 9:16 and 16:9 any time before rendering.
How do I remove the watermark?
Upgrade to any paid plan; paid renders have no watermark.
Do my edits save automatically?
Yes. Edits auto-save shortly after you stop typing.